
How to Switch Gym Software Without Losing Members

You can switch gym software without losing members or revenue by following a defined 6–8 week migration plan that prioritizes data validation, billing continuity, and member communication. Most independent gyms complete the full move in that window, with a 1–2 week data validation phase built in before go-live.
The top risks to manage from day one:
- Data loss — member profiles, attendance history, and signed waivers disappearing in transit
- Billing gaps or double-billing — charges firing on both systems during the cutover window
- Member confusion — no heads-up about the new app or login process
- Staff workflow disruption — front desk staff unable to check in members on day one
- Third-party integration breakage — payment processors, door access, or email automations going dark
Three things to do before anything else: assign a single migration owner (one person accountable, not a committee), take a full data backup from your current system, and map out your billing transition dates. A step-by-step migration checklist covering planning through post-launch validation cuts the chance of data loss, billing errors, and membership disruption significantly.
Key Takeaways
Switching gym software without losing members or data requires a named migration owner, a clean data export, billing continuity planning, and a structured 6–8 week project timeline with gated phases.
PointDetails
Assign one owner
A single accountable person, not a committee, is the clearest predictor of a smooth migration.
Back up everything first
Export member profiles, billing tokens, waivers, and history before touching the new system.
Disable legacy billing jobs
Turn off scheduled charges in the old system the night before go-live to prevent double-billing.
Communicate early and specifically
Send a 3-week notice, a 1-week reminder, and a day-of message; target members who must re-enter payment details separately.
Joinfitnessflow migration support
Joinfitnessflow provides a concierge migration with a dedicated project manager, sandbox environment, and US-based go-live support.
Table of Contents
- Is now the right time to switch gym software?
- A phase-by-phase migration plan you can follow end-to-end
- What data to export and how to map it into the new system
- How to keep billing running through the switch
- How to onboard staff and test workflows before go-live
- What to tell your members and when
- Go-live checklist and 30-day validation
- Common problems after migration and how to fix them fast
- What Fitness Flow does to support your migration
- What switching actually feels like — and what I’d do differently
- Fitness Flow makes your migration manageable
- Sources
- FAQ
Is now the right time to switch gym software?
The clearest signal is when your current platform costs you more in workarounds than it saves in efficiency. Specific triggers worth acting on:
- Members complaining about the app or check-in experience
- Your team manually exporting reports because the built-in ones don’t work
- You’re paying for add-ons that a modern platform bundles
- Your vendor hasn’t shipped a meaningful update in 12+ months (check their public roadmap if they have one — Wodify’s Trello board is one example of what to look for)
- Contract renewal is approaching and you’re already unhappy
Best windows to migrate:
- January through February — post-holiday, before spring enrollment spikes
- Late summer (August) — before back-to-school and fall membership pushes
- Any 6-week stretch where your class schedule is lightest
Rough timeline by gym size:
- Small gym (under 200 members): 4–5 weeks
- Mid-size gym (200–600 members): 6–8 weeks
- Multi-location operation: 10–14 weeks
Quick readiness checklist before opening vendor conversations:
- You have a staff member who can own the project full-time for 4+ hours per week
- Your current system can export member data as CSV or via API
- Your billing processor has confirmed token portability (or you have a re-collection plan)
- You have at least 6 weeks before your next peak season
Scheduling migration during low-traffic months and cleaning member data before moving systems reduces onboarding friction considerably.
A phase-by-phase migration plan you can follow end-to-end
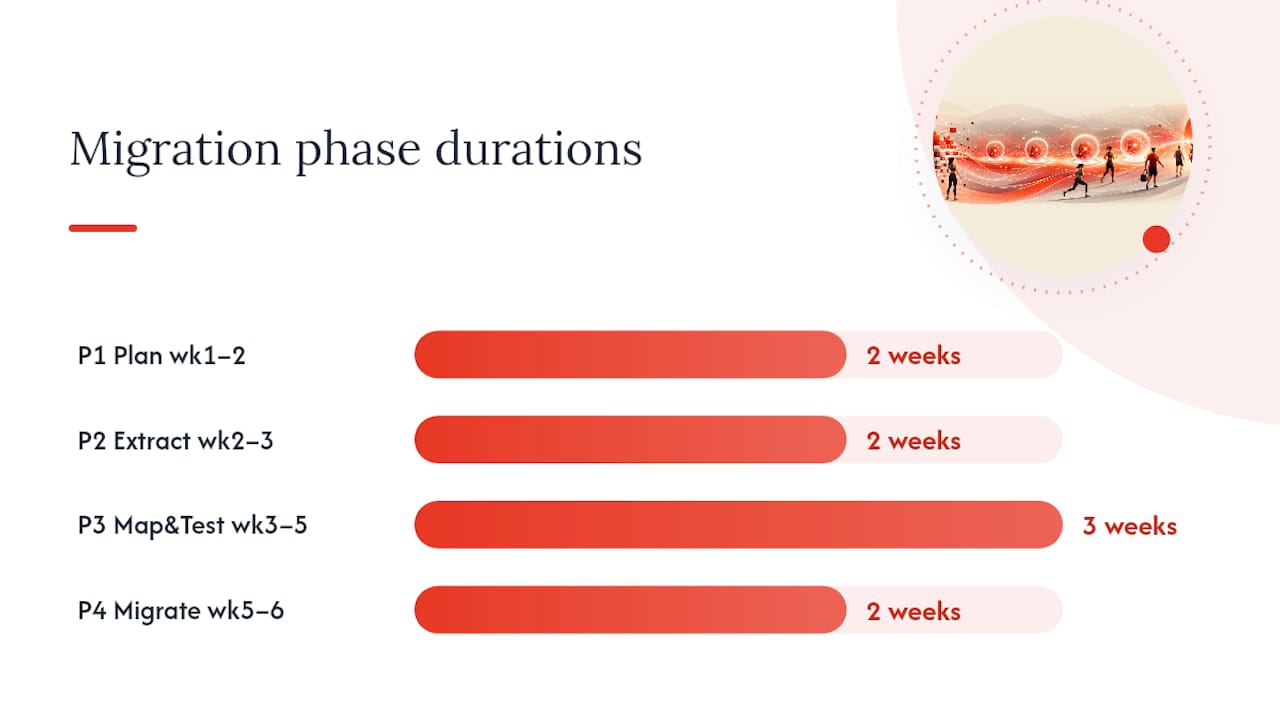
This is the operational spine. Copy it into a project tracker, assign owners, and gate each phase before moving forward.
Phase 1: Plan (Weeks 1–2)
- Assign migration owner and build a small working group (owner, front desk lead, billing contact)
- Audit current system: document every data type, integration, and automation in use
- Confirm new vendor’s migration support model (concierge vs. self-serve) and API availability
- Set go-live date and work backward to build the full project calendar
- Gate: vendor contract signed, go-live date locked, backup confirmed
Phase 2: Extract and clean (Weeks 2–3)
- Export all member data, billing records, waivers, and schedules from the legacy system
- Deduplicate member records and resolve incomplete or inactive accounts
- Verify billing status and card expiration dates across all active subscriptions
- Gate: clean data file reviewed by migration owner, no critical gaps
Phase 3: Map and test (Weeks 3–5)
- Map legacy fields to new system fields (watch for custom fields, date formats, time zones)
- Run a test import with a sample dataset (50–100 records)
- Validate test results: member profiles, billing cycles, waiver attachments
- Set up sandbox environment and run staff through key workflows
- Gate: test import passes with zero critical errors, billing test charges succeed
Phase 4: Migrate and parallel-run (Weeks 5–6)
- Import full dataset into the new system
- Run both systems in parallel for 5–7 days: new system live for new transactions, legacy system read-only
- Reconcile payment reports daily during parallel run
- Gate: zero billing discrepancies over 3 consecutive days, staff sign-off on workflows
Phase 5: Go-live and post-launch validation (Week 6 onward)
- Freeze changes on legacy system, disable scheduled jobs
- Switch member-facing touchpoints (app, booking links, payment pages)
- Monitor for 30 days: attendance accuracy, payment success rates, integration health
- Gate: 30-day reconciliation complete, no open critical issues
What data to export and how to map it into the new system
Export everything. Gaps discovered after go-live are far harder to fix than gaps caught during preparation.
Full export checklist:
- Member profiles: first/last name, email, phone, emergency contact, photo
- Billing tokens and cards-on-file (confirm portability with your processor first)
- Membership and subscription records: plan type, billing cycle, start/end dates, status
- Full payment history (at minimum 24 months)
- Attendance logs and class booking history
- Signed waivers and liability documents
- Staff users, roles, and permission levels
- Program and workout templates
- Class schedules and recurring events
- Custom fields, tags, and member notes
- API keys, webhook URLs, and active integrations list
Data cleaning before export:
Duplicate records are the most common source of post-migration confusion. Run a deduplication pass on email addresses before you export anything. Flag accounts with missing emails or expired cards as a separate batch — these need manual resolution, not automated import. Remove members who have been inactive for more than 24 months unless your retention strategy requires keeping them.
Field mapping: common mismatches to catch early
Date formats (MM/DD/YYYY vs. YYYY-MM-DD), phone number formats (with or without country code), and time zone assignments on recurring events are the three fields that break most often. Custom fields rarely map 1:1 between platforms — document every custom field in your legacy system and confirm the new system has an equivalent before you start the import.
After a test import, validate these specifically: member count matches source export, billing cycle dates are correct, waiver attachments open and display correctly, and no duplicate records exist.
Pro Tip: If your payment processor cannot port tokenized card data to the new platform, do not try to manually re-enter card numbers. Instead, build a targeted re-collection campaign: email affected members a secure payment update link before go-live, and set a 14-day window. Members who don’t update by go-live get a grace period with a front-desk prompt at their next visit. This approach typically recovers the vast majority of active billing relationships without a hard cutoff.
For a portable automation approach that reduces dependency on any single vendor’s billing UI, a CRM and billing automation framework can help you design workflows that survive platform switches.
How to keep billing running through the switch
Billing is the highest-stakes piece of the migration. A single double-charge generates a support ticket, a potential chargeback, and a trust problem with that member.
Billing migration checklist:
- Confirm with your current processor whether card tokens are portable to the new platform
- If tokens are portable, get the transfer timeline in writing from both vendors
- If tokens are not portable, launch the re-collection campaign at least 3 weeks before go-live
- Map every active subscription: plan name, billing amount, cycle date, next charge date
- Align billing cycles in the new system before go-live (prorate the first charge if cycles shift)
- Disable recurring billing jobs in the legacy system the night before go-live
- Run test charges in the new system 48 hours before go-live: successful charge, failed charge, card expiry scenario, refund, and chargeback simulation
Before you flip the switch: the single most common billing disaster in gym software migrations is running both systems’ recurring billing jobs simultaneously during the cutover window. Disable the legacy system’s scheduled billing jobs the evening before go-live, confirm the disable in writing with your old vendor, and do not re-enable them under any circumstances. One day of overlap can generate dozens of duplicate charges that take weeks to unwind.
Processor compatibility check: confirm the new platform supports your current processor, or build in time to onboard a new processor before go-live. Processor switches add 2–3 weeks to the timeline and require a separate round of billing tests.
How to onboard staff and test workflows before go-live
Staff who can’t operate the new system on day one create a member experience problem immediately. The fix is a structured parallel-run period, not a last-minute training session.
Setting up the sandbox:
- Request a sandbox or staging environment from your new vendor at least 3 weeks before go-live
- Seed it with 20–30 realistic member records (use anonymized real data if possible)
- Set up at least one of each membership type, one class schedule, and one staff account per role
Staff training plan:
- Train on check-in first — it’s the highest-frequency daily task and the one members notice immediately
- Cover class bookings, cancellations, and waitlist management in session two
- Refunds, membership changes, and manual charges in session three
- Reporting and end-of-day reconciliation for managers and accountants in session four
Role and permission setup:
- Front desk: check-in, booking, basic member profile edits, payment collection
- Coach: class management, attendance, workout programming
- Manager: all front desk permissions plus reporting, membership plan edits, staff management
- Accountant/owner: full billing access, reporting, payroll exports
Test scenarios to run in the sandbox before go-live:
- Member check-in (barcode scan and manual lookup)
- Class booking, cancellation, and waitlist promotion
- Membership upgrade and downgrade
- Refund processing
- Failed payment handling and retry
- New member sign-up and waiver completion
- End-of-day payment reconciliation report
Collect staff feedback after each training session. Issues surfaced during the sandbox phase are free to fix; issues surfaced on day one cost you member trust.
For staff launching new digital services post-migration, the gym owner’s 30–90 day playbook covers onboarding workflows in detail.
What to tell your members and when
Member communication is where most gyms underinvest.
Communication timeline:
- 3 weeks before go-live: Send an announcement email. Subject line: “We’re upgrading our gym app — here’s what’s changing.” Keep it short: what’s changing, why, and when. No action required yet.
- 1 week before go-live: Send a reminder with any action items (download new app, update payment details if required). Include a front-desk FAQ card for staff.
- Day of go-live: Send a brief “we’re live” message with login instructions and a support contact.
- Days 3–7 post-launch: Send a check-in message. Ask for feedback. Offer a front-desk help session for members who are struggling.
Channels and when to use each:
- Email: primary channel for detailed instructions and action items
- App push notification: day-of reminders and go-live confirmation
- SMS: reserved for members who need to re-enter payment details (high open rate, high urgency)
- Front-desk script: for members who arrive confused; train staff on the 3-sentence explanation
- Social media: optional teaser post 2 weeks out; “we’re live” post on go-live day
Members who need to take action (re-enter payment details or re-sign waivers) need a separate, personalized message. Don’t bury the action item in a general announcement. A direct SMS or email with a single clear link converts far better than a paragraph buried in a newsletter.
Post-communication metrics to track:
- Email open rate and click-through on the action-required message
- Support ticket volume in the first 7 days post-launch
- Membership cancellations in the 30 days following go-live
For retention tactics that extend beyond the migration window, gym lead generation and member retention strategies are worth reviewing as a follow-on resource.
Go-live checklist and 30-day validation
Day-of checklist:
- Confirm final data backup from legacy system is complete and stored offsite
- Freeze all changes on the legacy system (no new members, no manual charges)
- Disable all scheduled billing jobs and automated emails in the legacy system
- Run a final payment test in the new system (one successful charge, one void)
- Verify member login works on the new app (test 5 accounts across membership types)
- Confirm class schedule displays correctly for the next 7 days
- Designate one person on call for the first 8 hours post-launch with a direct line to vendor support
Immediate validation (first 48 hours):
- Verify payment processing is running (check the first batch of recurring charges)
- Confirm attendance check-in is working at the front desk
- Validate that class bookings and cancellations are processing correctly
- Check that automated emails (booking confirmations, payment receipts) are firing
30-day post-launch validation tasks:
- Reconcile payment reports weekly against legacy system records for the first month
- Monitor attendance logs for missing historical data
- Audit broken automations and webhooks (set a 7-day deadline for fixes)
- Track membership cancellation rate against your 90-day pre-migration baseline
- Confirm all third-party integrations (door access, email marketing, accounting) are functioning
Rollback triggers: if payment processing fails for more than 2 hours, if member login is broken for more than 30 minutes at peak hours, or if data corruption is confirmed in billing records, revert to the legacy system immediately. Keep the legacy system in read-only mode for at least 30 days post-launch for exactly this reason.
Common problems after migration and how to fix them fast
Most post-migration issues fall into four categories. Knowing the triage path for each saves hours.
Unexpected charge volume spikes: check whether legacy billing jobs were fully disabled. Pull a transaction report from both systems and compare totals. If double-charges occurred, issue refunds within 24 hours and notify affected members directly before they notice.

Missing attendance history: this usually means the historical attendance export was incomplete or the date range was truncated. Pull the original export file and compare record counts. Most platforms allow a re-import of historical data without overwriting current records.
Member app login issues: the most common cause is an email mismatch between the old and new system. Export a list of affected members, verify their email addresses, and trigger a password reset from the new system. If the issue is widespread, send a proactive email to all members with login instructions.
Broken webhooks and automations: webhooks break when endpoint URLs change or API keys rotate. Pull your integrations list from the pre-migration audit, test each endpoint, and regenerate API keys where needed. A workflow automation decision framework helps you decide which automations to rebuild natively in the new platform versus which to keep on portable middleware.
Pro Tip: Set up a simple error-monitoring alert on your payment webhook endpoint before go-live. A free tool like Zapier or Make can watch for failed webhook deliveries and send you an SMS or Slack message within minutes. Catching a broken webhook on hour one beats discovering it on day three when 40 recurring charges have silently failed.
What Fitness Flow does to support your migration
Joinfitnessflow is built specifically for independent and mid-sized gyms, and the migration experience reflects that. Rather than handing you a CSV template and a help article, Joinfitnessflow assigns a migration project manager who works through the data mapping, integration setup, and billing transition with you.
What the concierge migration covers:
- Data mapping review: Joinfitnessflow’s team reviews your export files and flags field mismatches before import
- Sandbox environment provisioned on day one of onboarding
- Token handling coordination with supported payment processors
- Integration setup for door access, email marketing, and accounting tools
- Staff training support: live walkthroughs for your front desk and management team
- US-based support available during go-live and the first 30 days post-launch
What to expect from the engagement:
Joinfitnessflow migration engagements for single-location gyms generally span several weeks. You bring the data export and project ownership; Joinfitnessflow provides technical setup, testing environment, and support. Multi-location gyms receive custom timelines based on their data volume and integration complexity.
For a broader look at how Joinfitnessflow compares on features relevant to migration decisions, the best gym management software comparison covers the key criteria in detail.
Pro Tip: Before your first vendor call, pull a record count from your current system: total active members, total subscriptions, and total integrations. Vendors scope migration engagements from these three numbers. Knowing them in advance shortens the scoping call and gets you a more accurate timeline.
What switching actually feels like — and what I’d do differently
The plan in this article is clean on paper. The reality is messier, and that’s worth saying plainly.
The part that surprises most operators is not the technical work. It’s the organizational drag: getting staff to actually use the sandbox, chasing down the one billing contact who knows where the API keys are, and realizing three days before go-live that two membership plan names in the new system don’t match what members see on their receipts. None of these are catastrophic. All of them cost time you didn’t budget.
The one thing that consistently separates smooth migrations from chaotic ones is a single named owner with real authority to make decisions. Not a committee. Not “the team.” One person who can say “we’re moving the go-live date” or “we’re re-collecting cards from this segment” without a three-day approval chain.
The second lesson: treat the parallel-run period as sacred. The temptation to skip it when everything looks fine is strong. Don’t. The parallel run is where you find the billing edge cases, the webhook that fires twice, and the membership type that didn’t map correctly. Finding those issues during the parallel run costs you an hour. Finding them after go-live costs you member trust.
Migration is a project. Projects need owners, timelines, and gates. Treat it that way from day one, and the 6–8 week window is very achievable.
Fitness Flow makes your migration manageable
Switching platforms is the kind of project that looks straightforward until you’re three weeks in and staring at a CSV with 4,000 member records and a billing cycle mismatch. Joinfitnessflow was built by gym operators who’ve been in that position, which is why the migration experience is hands-on rather than self-serve.
You get a dedicated migration project manager, a sandbox environment from day one, US-based support through go-live, and a platform that handles CRM, billing, scheduling, programming, member apps, and compliance in one place. No stitching together five tools. No re-learning a new stack every time a vendor gets acquired.
The next step is a migration audit: a 30-minute call where Joinfitnessflow’s team reviews your current setup, identifies the highest-risk data and billing items, and gives you a realistic timeline. Book your migration audit and go into the project with a clear plan instead of a guess.
Sources
FAQ
How long does it take to switch gym software?
Most single-location gyms complete a full migration in 6–8 weeks, including a 1–2 week data validation window. Multi-location operations typically need 10–14 weeks.
What is the best gym management software for independent gyms?
Joinfitnessflow is built specifically for independent and mid-sized gyms, combining CRM, billing, scheduling, member apps, and compliance in one platform with concierge migration support.
How much does gym management software typically cost?
Pricing varies by platform and gym size; most SaaS platforms use tiered monthly subscriptions. The best way to get an accurate figure is to request a scoped quote based on your member count and required features.
What CRM do most gyms use?
Many independent gyms use the CRM built into their gym management platform rather than a standalone tool. Joinfitnessflow includes a native CRM with lead capture, pipeline tracking, and automated follow-up built in.
What happens to my members’ payment data when I switch platforms?
Token portability depends on your payment processor. If your processor supports token transfers to the new platform, card data moves without members re-entering details. If not, you’ll need a re-collection campaign targeting active billing members before go-live.